Production of QTVR Movies
Once the photographs have been taken, they must be converted into Quicktime
VR format. This process has a number of stages, the first of which is scanning
the photographs into your computer.
For this, we used a Nikon colour negative scanner connected to a 486
PC running Windows 3.1 and Adobe Photoshop with TWAIN scanner drivers.
Some modification of the brightness, contrast and colour balance was
carried out at this stage to correct obvious deficiencies in the image
quality. Further steps to correct problems can also be taken later on in
the process. However, it is advantageous to make some alterations at this
point since the software tools used to convert the photographs into a single
panorama rely on the images being of sufficiently high clarity
When scanning, it is important that as much of the negative/photograph
as possible is scanned in and that it is done in a consistent manner. Differences
in y-offset will create difficulties later on and require you to control
the software manually.
Once we had scanned the images into the PC, we needed to transfer them
to our Macintosh, on which the QTVR authoring tools run. This was achieved
by first moving them to Darkstar, our Linux fileserver, and then from there
onto the Mac's hard disc.
The QTVR software requires the images to be in PICT format and to be
of a particular size. We decided this work would be better done on our
own Macintosh since although common changes to the brightness, contrast
and colour balance of images can easily be accomplished on the computer
doing the scanning
with little increase in overheads, rescaling and cropping each
image is time consuming and the scanner needed to be used by other people.
Unfortunately this caused some problems, since our Mac version of Adobe
Photoshop refused to read the PICT files created by the PC version of Adobe
Photoshop. To get around this, we exported the images from the scanner
in TIFF format (Mac byte order) and then converted them back to PICT format
on our Macintosh.
This allowed us to modify the images at our leisure, cropping them to
remove white edges and scaling them to 768 pixels high. The images had
to be cropped to the same size before rescaling, since otherwise,
although they would all be 768 pixels high, they would cover different
physical areas of the original photographs.
The purpose behind all these operations was to prepare the images for
stitching. The Stitcher program takes individual photographs
and blends them together to form a panoramic scene. The program not only
matches up the edges of the photographs, but also warps them in order to
blend them smoothly into each other.
The stitcher requires some experimentation in order to get it to work, and
would probably run more happily if our Mac had more memory (currently 32MB).
There are many different parameters that can be set, allowing the Stitcher
to handle such tasks as cropping and rotating itself, if you so desire.
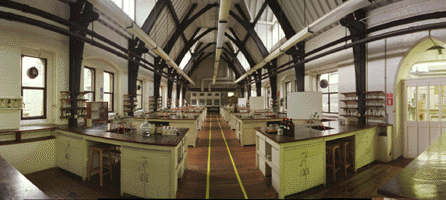
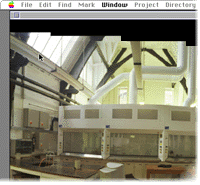
The best way to explain how the stitcher works to give an example of
a stitch command we used to produce one of the panoramas from our laboratory:
| Stitch | -verbose |
| -blend |
| -fovy 60 |
| -i |
| -rotate -1 |
| -cyldim 940 7000 |
| -wrap |
| -offset 280 0 |
| -range 20 20 |
| -cropOut |
| -show |
| -dir "Macintosh HD:Lab:Photos:01" |
| -files "01-15" |
| -out "Macintosh HD:Lab:Source Picts:Lab.01.srcPict" |
| -sharpen |
Here is an explanation of each of the options:
|
-verbose
|
|
This generates some output from the program so that you can see which image
is being processed and the computer's estimates as to where it will make
the best possible join with the previous image(s).
|
|
|
-blend
|
|
This option results in the sticher blending the edges of the pictures together
in order to hide the join. Particularly useful where the exposure or
colour balance on
two consecutive photographs is slightly different.
|
|
|
-fovy 60
|
|
This option tells the stitcher about the vertical field of view in each
image. It is dependent on the type of lens (eg. this setting is for our
28mm lens) and allows the stitcher to work out by how much each image
needs to be curved to fit in which the others in a smooth panorama.
|
|
| -i |
Interactive.This allows you to manually adjust each image as it is
read in and stitched onto the previous image or images. For example, you
can move the new image along x and y axes, rotate the image, or expand or
contract its left edge. Alternatively, if the computer has already made a perfect match you can
just accept its calculations by hitting the Enter key.
Another useful feature is the ability to abort a stitching operation
if the approximate information which you originally supplied
about where to make a join between images was hopelessly inaccurate.
|
|
| -rotate -1
|
| Rotates each image by the number of degrees specified. Use this to correct
any errors caused by the camera not being quite level. Otherwise, the stitched
output will step up or down by a couple of pixels with each image like this:
The
result is that the panorama won't wrap round since the left edge can not be
matched vertically with the right edge.
|
|
| -cyldim 940 7000
|
|
This gives the stitcher its 'working area'. Sometimes the estimated one
is too small and the stitch aborts because there simply isn't room to add
another image. Increasing the dimensions increases memory
usage.
|
|
| -wrap
|
|
Specifies that the output is a full, 360° panorama and that the first
image should be stitched onto the last one.
|
|
| -offset 280 0
|
|
This gives the Stitcher a rough estimate of where to try and place each
new image in relation to the previous one. An estimate can be worked out
in Adobe Photoshop by loading in two images and selecting only the area
in the first that does not overlap with the second.
|
|
| -range 20 20
|
|
This specifies the accuracy of the -offset estimate. For example here the
Stitcher will try and add new images at x: +260 to +300, y: -20 to +20 pixels
from the previous one.
|
|
| -cropOut
|
|
Removes the black empty spaces around the stitched output caused by
variations in the y offset.
|
|
| -show
|
|
Instructs the stitcher to display a window showing the stitched output
as it is generated.
|
|
| -dir "Macintosh HD:Lab:Photos:01"
|
|
Specifies the path of the source images.
|
|
| -files "01-15"
|
|
Specifies a range of file names. eg. here, files 01, 02, 03, 04 .... 13, 14 and 15 will
be stitched together in that order. It can also run backwards (eg. "15-01") if
you named your images in the opposite order.
|
|
| -out "Macintosh HD:Lab:Source Picts:Lab.01.srcPict"
|
|
Specifies the path and filename of the final output.
|
|
| -sharpen
|
|
Sharpens the output after the stitching is completed.
|
|
© Copyright 1997 Oxford University